
Day 1 – Demo and Cleaning – Part 1 (cleaning)
October 13th, 2012
Being on a tight budget for this rather large project, we plan to do as much as we can ourselves. Two major components of the DIY part are demo, and clean up. I mean, if you’re tearing things out and demolishing stuff it’s a lot easier (and less professional skill requiring) than building things back up. That’s what the pros are for! And cleaning? Remember the peeling paint and nicotine stained walls? Anyone can do that it just takes a little bit of elbow grease!
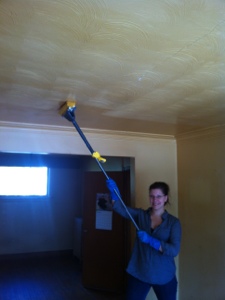
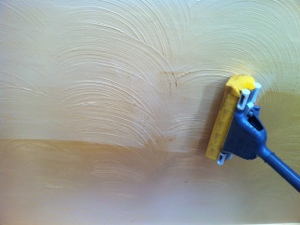
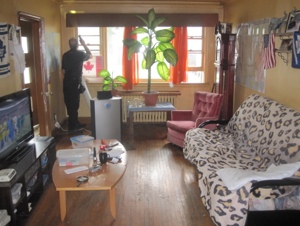
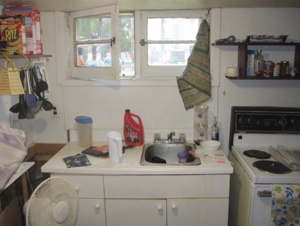
So, I’ll leave the bathroom demo tale to Matt, but I have a few choice words to say about cleaning the living and dining room… The plan to start was to wipe down the walls and ceiling with water & TSP to start getting the nicotine and other stains off the walls so the place could start to air out. When I refer to ‘other stains’, to be honest I’m not sure exactly what they were. Sort of looked like someone threw coffee at the walls in random places. If it wasn’t coffee, I don’t want to know what it was!
To be able to reach the top of the walls and the ceiling (ceiling height is pretty high which is nice) I decided to use a mop. Filled up my bucket of TSP and water dipped the mop and ready to go! Yes, I did mop walls and ceilings.
OMG!!!! The walls and ceiling looked to be a dark mustard yellow type color but were in fact a pale cream or off white color. So gross! How much chain smoking and non cleaning does it take to get to that level of build up?? It took me 6 hours and two large size containers of TSP to do a once over of the living/dining room area. It’s going to need at least two more cleanings for sure!
I am by no means a neat freak but still sometimes I think my house is dire need of cleaning… It so does not even compare.
Posted in Cleaning, Home Improvement | 1 Comment
Let there be Locks!
October 13th, 2012
Now that we’ve gotten possession of the house there is a burning issue that need to be addressed! We need to change the locks!
With a house that effectively had a revolving front door you never know who might just show up with a key or two and try letting themselves in. Yes there might be nothing of any value in the house but over the years the ‘ole frat boys’ really kept the party going even providing a place to live for people down on their luck.
Now the reason I’m mentioning this is because while its been alluded to a few times with the ‘frat boys’ comments there were more than a couple unsavory characters passing through this house over the years. Our new neighbours seem very friendly but do love to gossip! While I’m fairly sure that none of them will come by the house and try to let themselves in… you never can tell.
The locks have been changed!
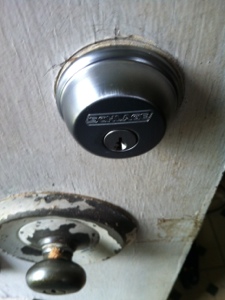
The first door presented only a mild challenge in that the screws on the new deadbolt didn’t quite line up making the whole thing hard to screw in. But its in.
Now the second door, taking off the old lock I discovered something interesting. The hole that was in place to hold the lock was considerably smaller than what is a normal size. This didn’t surprise me – the lock looked older than me and over times standard sizes of things change.
The problem is the deadbolt I purchased was new and thus needed the opening in the door to fit what is currently a ‘standard size’ – too bad I didn’t have anything to make said opening.
The front door lock has temporarily thwarted me!!
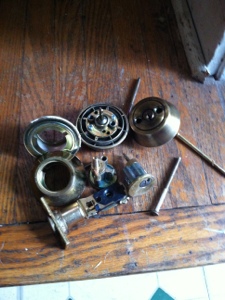
A couple hours later I returned to the house because the HVAC guy was coming by for an estimate and this time I brought the big guns! The drill and the circular hole implement (yes I don’t know what its called but I do know how to punch round circular holes with it).
This time I won! Hole was punched and the lock installed.
Now no one without a new key can make it in!
The empty house is safe once again!
As an aside: while tackling the demanding task of replacing the locks on the doors I also met with the architect/engineer who we’re getting to plan out the drawings and the HVAC guy to go over the installation of the Furnace and AC.
Things are progressing!
Posted in Home Improvement, News and Updates | No Comments
The Purell Story
October 12th, 2012
So we impulse bought a house. Yes, I did say we and no it is not the royal We it was an actual joint craziness. Having been through a round of renos once, we saw the potential in this disgusting old house and were all full of plots and plans on how to fix it up and make it our own. Full to bursting with ideas, we immediately engaged our kitchen guy (who did the custom cabinets in our current house) and roped in a general contractor who happened to be an old work colleague of my husband’s (who gave up the headaches of the corporate world to be his own boss in the reno business a number of years ago). We psyched them up and brought them to the new house for a walk through pre-closing so we could get moving with our lofty reno plans and be ready set go when the time came for possession.
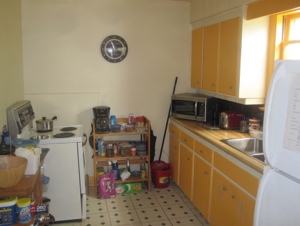
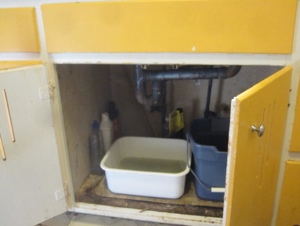
So, 3 elderly gentlemen and one old lady were living in this place and they spent their days drinking beer and chain-smoking inside (hence the frat house nickname). One of them had a dog who would occasionally pee on the floors. Do you think anyone ever did any cleaning? Definitely not! When we went for the visit, we spent about an hour in the house, with one of the good ole frat boys floating around along with the cute but pee making dog, talking through plans and taking measurements. Isn’t the place supposed to be empty when you book a visit?? Anyways…. Cobwebs, nicotine stains on the walls, peeling paint, leaking kitchen sink and scary ass basement, we combed through the whole place. I still can’t believe people actually lived there it was so gross?!! Experienced guys both, the kitchen guy and our GC maintained their business professional hats throughout the visit. Then we exited the building.
Once outside in the fresh air, our kitchen guy made a beeline for his truck and pulled out a bottle of Purell. A generous squirt in hand, he considerately then offered the sanitizer to our GC who said, “While I don’t normally use this stuff, I’m feeling the need today,” and he promptly squirted double the amount into his own hands. By this time, my husband and I were laughing but let me tell you, we took some too.
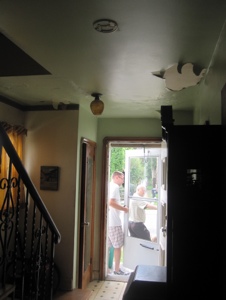
If the contractors are grossed out by the place, do you think that should be cause for worry? Nah….
A couple of weeks post Purell incident, we finally took possession of our new house. An exciting moment in anyone’s life, full of possibilities for the future and inevitably a bit of sadness for the home that you’ll be leaving behind. Of course on closing day, we did what any couple would do when given keys to your new home; we drove over to see it. Full of excitement for the reno plans that were taking shape via phone, email and drawings, we eagerly walked up to the front door. After trying every key multiple times, we finally managed to get the door open. Did I mention that the doors and locks also need to be replaced? Anyhow, we walked into the front hallway and stopped to breathe in and absorb that exciting new house feeling… And then I promptly gagged from the stench (Remember nicotine stained walls and dog pee smell? Doesn’t smell any better post removal of the cause of said smells!) and I had to step over to the window for an actual breath. That unfortunately put me face to face with a water damaged window and a nice fat spider. Back away slowly… Now while not one of those ladies who shrieks at the sight of a bug, let’s just say I’m not overly fond of spiders. So, welcome to the house!
We did our walk through, checking to see that cupboards and closets had been emptied and talking about next steps. Here we go, the planning is about to imminently become reality. Reno rollercoaster and unexpected surprises here we come!
Oh, and once we left I promptly went to the grocery store and bought some Purell.

Posted in Home Improvement | 1 Comment
Can you impulse buy a house?
October 10th, 2012
A little bit of history before I begin… We finally finished all our major renos in our current house, from removing knob and tube to gutting and redoing a kitchen and two bathrooms, and we were well satisfied with the results. Pretty proud of ourselves in fact thinking about how handy we’ve become with the whole reno thing post condo. So there I was a couple of months ago, with no new projects in sight, enjoying a cup of coffee on a lazy Saturday morning, when I had the brilliant idea to go poking around on MLS to see what the poop on the scoop was in the area. Within minutes I found an interesting looking property not far from our current location. The price was looking good for the neighborhood so of course I just had to say, “honey, come take a look at this!” Needless to say, the house was purchased within days (yes we did impulse buy a house!) and panicked craziness ensued getting our house sold in record time and now here we are.
Where exactly are we you ask? Well remember that interesting property at a good price close to where we are now? Well it was a reasonable price for a reason…. Ok, let’s make that a few reasons… Think old man frat house, and forget about outdated think disgusting. Oh yes, and let’s not forget to mention radiators and the dog who peed on the once lovely original hardwood floors. Yup, we have ourselves a project folks. A project big enough to be worthy to write about.
And now we are ready to begin….

Posted in Home Improvement, News and Updates | 1 Comment
DIY vs Contractors
September 19th, 2008
Some projects can be done by anyone with some effort and practice and some should be done by pros. I would even go so far as to say that most projects can be done by yourself as long as you’re somewhat handy. With that said some just can’t be; Not Made of Money posted a great article where they point out 5 repairs that should be done by a professional.
This got me thinking – really when do you call a contractor to come in and do a project? Well there are a few times that come to mind:
- If the work involved requires specialized skills and knowledge
- When you’re not sure how to start or finish the project
- If there are a lot of unknowns
- Its a large job
Not Made of Money’s list is a great starting point for trying to figure if you should bring in a contractor or not. Choosing a contractor can be a daunting task at times but starting a project to find out you can’t complete it can be worse. You can save yourself a lot of money if you’re capable of doing the project yourself but if you don’t know what you’re doing you might end up costing yourself even more. When unsure ask questions, research and get advice before starting.
Posted in Home Improvement, Tips and Hacks | No Comments
How to Hire a Contractor
September 15th, 2008

Knowing that you need a contractor to do a job is one thing now comes the hard part: you need to find this contractor. Contractors come in all shapes and sizes from the really good ones to the ones that shouldn’t be handling tools. Personally I’ve been fairly lucky in my dealings with contractors, I’ve never had to fire one for incompetence nor have I had to fight with one over money or work done. Needless to say if you’re not careful hiring the wrong contractor can really make your life miserable.
Getting a professional to come in and do work in your house can really increase the value of your home and your enjoyment of it. Simplifying and updating a kitchen are things that most people would have difficulty completing themselves. Here are some ideas on how to find and hire a contractor:
Family and Friends – Ask your family and friends if they’ve ever used a contractor that they liked. They’ll be able to tell you their experiences right away. This can save you a lot of looking around not to mention the contractor is likely to want to do a good job so they can get more referrals
Real Estate Agents – I’ve had more quality contractors referred to me by my real estate agent than anyone else. First off it’s in their best interest to help you out and they’ll have heard if the contractor is good or not.
Sites and Shows – There are a ton of reality shows about house construction or upgrades. These shows often use contractors to help them out and they will say who helped them. You’re not guaranteed a good contractor but chances are pretty decent.
Phone Book – I’d go to this resource last mostly because you’re shooting in the dark. But when all else fails there will be people to help you out here.
Now that you’ve contacted a contractor and they’re quoting the job there are two things that you really need to remember to make sure you’re protected.
Check References – If you don’t know the contractor ask for their references and check them. If they give you a short list or ask why warning flags should be going up. If the person does good work they would want their previous customers to vouch for their work.
Get the quote in writing – Construction or upgrade projects are filled with unknowns and some contractors see this as an opportunity to take advantage of people. Make sure you get the quote in writing before any work begins. Again this is to cover yourself especially if you’re not familiar with the type of work the person is doing.
Good Luck with your project!
Posted in Home Improvement, Tips and Hacks | 1 Comment
6 Steps to Painting a Room
August 21st, 2008
When it comes down to it most people don’t like to paint it can be hard work when you make a mistake its there until you repaint. I’ve done a whole bunch of painting lately and I’ve gotten a system in place that makes it as painless as possible
- Plan out your project – Start off by figuring out everything that you need to do. This holds true with every project and its no less true here. When you plan out a painting job you’ll know everything you need and the steps you need to take.
- Prep the room – First off you need to make sure you can get at the walls easily and that they’re clean. If you’ve got any holes to patch do that first.
- Tape what needs to be taped – Use painters tape (it comes off easier). Tape the ceilings, baseboards, around windows and outlets and anything that needs to be taped.
- Paint the first coat – Start with the edging then paint with the roller
- Check to see if additional coats are needed – after the first coat you’ll know if you need to paint a second or third coat (repeat the painting as necessary)
- Remove the tape and put the room back in order
Overall painting a room shouldn’t be a big ordeal though many people make out to be one. If you plan ahead and prepare painting a room with 2 coats should take no more than a few hours including the wait time between coats. Wait a couple hours to remove the tape and guess what, you’re done. A simple way to improve your house!
A couple things to keep in mind – if you’re not sure about primers or what type of paint to use talk to your paint specialist. These people are around paint all the time and they know what you could expect. Their recommendations can save you lots of time (and energy).
Posted in Home Improvement, Tips and Hacks | No Comments
Painting – A Simple Way to Improve Your House
August 19th, 2008
A simple coat of paint is probably the easiest way to change a room up without spending a fortune and at the same time adding value to your house. A coat of paint can make a small room look bigger and an over sized room look cozier. I’ve been painting our new house over the past few weeks and I am now starting to realize how powerful a coat of paint can be. Our new house was all painted with one colour and it was this ugly yellowish brown colour that wasn’t flattering to anything else in the house. Now with some different paint choices (and a lot of whites) the house looks a lot better.
We chose a lot of whites because of our furniature and the colour of the carpets but we accented this with curtain colours and an accent wall. The house now has a very bright feel to it that wasn’t present before. These bright walls really make the rooms seem larger where before the coolish darker colours really made is seem old.
Now we started the painting process from day one of moving in so the rooms were empty when the painting started thus we missed out on a great way to improve our house. When you take on a painting project you have the great opportunity to declutter the room and throw things out. It forces a detailed cleaning of the room which can really help as much as the paint.
Posted in Home Improvement | No Comments